 Jacob Tomlinson
Originally published on the Dask blog on August 21st, 2020.
For the last couple of months we’ve been running community tutorials every three weeks or so. The response from the community has been great and we’ve had 50-100 people at each 90 minute session.
Why should open source projects run tutorials
The Dask team has historically run tutorials at conferences such as SciPy. With 2020 turning out the way that it has much of this content is being presented virtually this year. As more people are becoming accustomed to participating in virtual tutorials we felt it would be a good service to our community to start running regular virtual tutorials independent of conferences we may be attending or speaking at.
Tutorials are great for open source projects as they appeal to multiple types of learner.
- The tutorial material provides a great foundation for written and visual learners.
- Using an interactive tool like Jupyter Notebooks allows kinesthetic learners to follow along and take their own paths.
- Having an instructor run through the material in real time provides a spoken source for auditory learners.
- It’s also just fun to have a bunch of people from around the world participate in a live event. There is a greater sense of community.
Many open source projects provide documentation, some also make instructional videos on YouTube, but you really can’t beat a tutorial for producing a single set of content that is valuable to many users.
The more users can share knowledge, information and skills with the more they are going to use and engage with the project. Having a great source of learning material is critical for converting interested newcomers to users and users to contributors.
It is also great for the maintainers too. Dask is a large project made up of many open source repositories all with different functions. Each maintainer tends to participate in their specialist areas, but do not engage with everything on a day-to-day basis. Having maintainers run tutorials encourages them to increase their knowledge of areas they rarely touch in order to deliver the material, and this benefits the project as a whole.
How
For the rest of this post we will discuss the preparation and logistics we have undertaken to provide our tutorials. Hopefully this will provide a blueprint for others waning to run similar activities.
Writing the material
When starting to compile material is it important to consider a few questions; “Who is this for?”, “How long should it be?” and “What already exists today?”.
For the Dask tutorial we were targeting users who were either new to Dask, or had been using it for a while but wanted to learn more about the wider project. Dask is a large project after all and there are many features that you may not discover when trying to solve your specific challenges with it.
At large conferences is it quite normal to run a three hour tutorial, however when trying to schedule a tutorial as part of a person’s normal working day that is probably too much to ask of them. Folks are accustomed to scheduling in work meetings that are typically 30-60 minutes, but that may not be enough to run a tutorial. So we settled on 90 minutes, enough to get through a good amount of content, but not too long that folks will be put off.
We already have an “official” tutorial which is designed to fill the three hours of a SciPy tutorial. This tutorial is also designed as a “Dask from first principals” style tutorial where we explore how Dask works and eventually scale up to how Dask implements familiar APIs like Numpy and Pandas. This is great for giving folks a thorough understanding of Dask but given that we decided on 90 minutes we may not want to start with low level code as we may run out of time before getting to general usage.
While researching what already exists I was pointed to the Mini Dask 2019 tutorial which was created for an O’Reilly event. This tutorial starts with familiar APIs such as dataframes and arrays and eventually digs down into Dask fundamentals. As tutorial content like this is often licensed as open source and made available on GitHub it’s great to be able to build upon the work of others.
The result of combining the two tutorials was the Dask Video Tutorial 2020. It follows the same structure as the mini tutorial starting with high level APIs and digging further down. It also includes some new content on deployment and distributed methods.
Structuring content
To ensure this content targets the different learner types that we discussed earlier we need to ensure our content has a few things.
As a foundation we should put together a series of pages/documents with a written version of the information we are trying to communicate for written learners. We should also endeavor to include diagrams and pictures to illustrate this information for visual learners.
As we are sharing knowledge on an open source software project we should also make things as interactive as possible. Using Jupyter Notebooks as our document format means we can include many code examples which both provide written examples but are also editable and executable to empower kinesthetic learners to feel how things work in practice.
When the content is being delivered the instructor will be running through the content at the same time and narrating what they are doing for auditory learners. It is important to try and structure things in a way where you explain each section of the content out loud, but without directly reading the text from the screen as that can be off-putting.
We also want to ensure folks are taking things in, and labs are a great way to include small tests in the content. Having a section at the end of an example which is incomplete means that you can give the audience some time to try and figure things our for themselves. Some folks will be able to fill things in with no problems. For others they will hit errors or make mistakes, this is good for teaching how to debug and troubleshoot your project. And for those who are having awful flashbacks to pop-quizzes they can simply skip it without worrying that someone will check up on them.
For each section of content you want to include in your tutorial I recommend you create a notebook with an explanation, an example and some things for the audience to figure out. Doing this for each section (in the Dask tutorial we had 9 sections) the audience will quickly become familiar with the process and be able to anticipate what is coming next. This will make them feel comfortable.
Hosting the material
Once you have put your material together you need to share it with your attendees.
GitHub is a great place to put things, especially if you include an open license with it. For narrative tutorial content a creative commons license if often used which requires modifications to also be shared.
As we have put our content together as Jupyter Notebooks we can use Binder to make it possible for folks to run the material without having to download it locally or ensure their Python environment is set up correctly.
Choosing a video platform
Next we have to decide how we will present the material. As this is a virtual tutorial we will want to use some kind of video conferences or streaming software.
These tools tend to fall into two categories; private meetings with a tool like Zoom, Hangouts or Teams and public broadcasts on websites like YouTube or Twitch.
Any of these options will likely be a good choice, they allow the presenter to share their video, audio and screen with participants and participants can communicate back with a range of tools.
The main decision you will have to make is around whether you want to restrict numbers or not. The more interactivity you want to have in the tutorial the more you will need a handle on numbers. For our initial tutorials we wanted to enable participants to ask questions at any time and get a quick response, so we opted to use Zoom and limit our numbers to allow us to not get overwhelmed with questions. However if you want to present to as many people as possible and accept that you may not be able to address them all individually you may want to use a streaming platform instead.
It is also possible to do both at the same time. Zoom can stream directly to YouTube for example. This can be useful if you want to open things to as many folks as possible, but also limit the interactivity to a select group (probably on a first-come-first-served basis). For the Dask tutorials we decided to not livestream and instead run multiple tutorials so that everyone gets an interactive experience, but we are fortunate to have the resources to do that.
Registering attendees
There are a couple of reasons why you may wish to register attendees ahead of time.
If you want to limit numbers you will certainly need some way to register people and put a cap on that number. But even if you are streaming generally you may want to get folks to register ahead of time as that allows you to send them reminder emails in the run up to the event, which likely will add more certainty to the attendance numbers.
As our event was private we registered folks with Eventbrite. This allowed us to cap numbers and also schedule automated emails to act as a reminder but also share the details of the private Zoom meeting.
When running the Dask tutorials we found about 50% of the folks who registered actually turned up, so we accounted for this an set out limit to around double the number we wanted.
Here’s an example of the event details what we created:
Event Title: Dask Tutorial
Organizer: Presenter’s name
Event Type: Seminar or talk, Science and Technology, Online event
Tags: dask, pydata, python, tutorial
Location: Online event
Date and time: Single Event, add times
Details:
Come learn about Dask at this online free tutorial provided by the Dask maintainers.
This ninety minute course will mix overview discussion and demonstration by a leader in the Dask community, as well as interactive exercises in live notebook sessions for attendees. The computing environment will be provided.
If you want to get a sample of similar content, take a look at https://tutorial.dask.org (although this tutorial will cover different material appropriate for this shorter session).
We look forward to seeing you there!
Image: 2i1tMNG.png
Live video content: NA
Text and media: NA
Links to resources: Tutorial Content (Online Jupyter Notebooks) https://github.com/jacobtomlinson/dask-video-tutorial-2020
Ticket Cost: Free
Ticket Attendee limit: 150 people
Count down to the tutorial
We also set up a series of automated emails. You can find this under Manage Attendees > Emails to Attendees in the event management page.
We scheduled emails for two days before, two hours before and 10 minutes before to let folks know where to go and another a few hours after to gather feedback. We will discuss the feedback email shortly.
You’ll need to ensure you have links to the materials and meeting location ready for this. In our case we pushed the content to GitHub and scheduled the Zoom call ahead of time.
Two days and two hours before
Hi Everyone!
We look forward to seeing you <tomorrow|soon>. We wanted to share some important links with you to help you connect to the meeting.
The materials for the course are available on GitHub here at the link below:
<Link to materials>
This repository contains Jupyter notebooks that we’ll go through together as a group. You do not need to install anything before the tutorial. We will run the notebooks on the online service, mybinder.org . All you need is a web connection.
The meeting itself will be held by video call at the following Zoom link:
<Zoom link and pin>
We look forward to seeing you soon!
<Organisers names>
Ten minutes before
Hi Everyone!
We are about to get started. Here’s a final reminder of the meeting details.
<Zoom link and pin>
See you in a minute!
<Organisers names>
Few hours after
Hi Everyone!
Thank you so much for attending the Dask tutorial. We really hope you found it valuable.
We would really appreciate it if you could answer a couple of quick feedback questions to help us improve things for next time.
<Google form link >
Also we want to remind you that the tutorial materials are always available on GitHub and you can run through them any time or share them with others.
<Link to materials>
Thanks,
<Organisers names>
Getting the word out
Now that we have an Eventbrite page we need to tell people about it.
You may already have existing channels where you can contact your community. For Dask we have an active twitter account with a good number of followers, so tweeting out the link to the event a couple of times the week running up to the tutorial was enough to fill the spaces.
If you have a mailing list, or any other platform you will probably want to share it there.
Setting up the call
Be sure to join the call ahead of the attendees. I would make sure this is at least before the final reminder email goes out. Personally I join 20 minutes or so before hand. This allows you to ensure the call is being recorded and that attendees were muted when they join.
Consider the experience of the user’s here. They will have signed up for an event online, received a few emails with Zoom call details and then they will join the call. If there is no indication that they are in the right place within a few seconds they may become anxious.
To combat this I tend to show some graphic which lets people know they are in the right place. You could either use a tool like OBS with Zoom to create a custom scene or just share your screen with a simple slide saying something like “The Dask tutorial will start soon”.
The only downside to sharing your screen is you can’t continue to use your computer in the run up to the tutorial.
When we ran our first few tutorials we were also running our Dask user survey so also included a link to that on the waiting screen to give folks something to do.
Greeting and getting folks set up
Say hi on the hour and welcome everyone to the tutorial. But as the event is virtual folks will be late, so don’t kick off until around five minutes in, otherwise you’ll just get a flood of questions asking what’s going on.
Interactivity
A fun thing to do during this waiting period is get everyone to introduce themselves in the chat. Say something like “Please say hi in that chat and give your name and where you are joining from”.
This is nice feedback for you as the instructor to see where folks are joining from, but it also gives the attendees a sense of being in a room full of people. One of the benefits of an event like this is that it is interactive, so be sure to say hi back to people.
I’m awful at pronouncing names correctly so I tend to list the places they said they are from instead. It still makes them feel like their message has been seen.
Once you’re ready to start introduce yourself and a general overview of the tutorial content. Then make use of any interaction tools you may have in your chat application. In zoom there are buttons that participants can click with labels like “go faster”, “go slower”, “yes” and “no”. These are great for getting feedback from the audience when running the tutorial, but it’s good to make sure everyone knows where they are and has a go at using them. I tend to explain where the buttons are and then ask questions like “have you managed to launch the binder?”, “have you used Dask before?” or “are you a Pandas user?”. You learn a little about your audience and they get familiar with the controls.
Being interactive means you can also respond to user questions. In Dask tutorials we mute everyone by default and encourage folks to type in the text chat. We also have an additional instructor who is not delivering the material who is able to watch the chat and answer questions in real time. If they feel like a question/answer would be beneficial to the whole group they can unmute and interrupt the presenter in order to bubble it up. Be prepared for a wide range of questions from the chat, including topics that are not being actively covered in the tutorial. This is often the only time that attendees have real-time access to core maintainers.
You may not have the resources to have two instructors for every tutorial, Dask is fortunate to have a strong maintainer team, so instead you may want to allocate breaks at the end of each section to answer questions. During the labs can be a good time to go back and review any questions.
Interactivity is one of the big benefits a live tutorial has over a video.
Run through the material
Once you’re all set up and everyone is in it’s time to run through the material. Given the amount of preparation we did before hand to construct the material this is relatively straight forward. Everything is laid out in front of us and we just need to go through the motions of talking through it.
I find it very helpful to have a list of the sections with timings written down that I can refer to in order to pace things.
- Overview of Dask with Dask Dataframe (10 mins)
- Introductory Lab (10 mins) and results (5 mins)
- Dask GUI and dashboards (10 mins)
- Dask Array (10 mins)
- Dask ML with lab (10 mins) and results (5 mins)
- Bags and Futures (10 mins)
- Distributed (10 mins)
- Wrapup and close (5 mins)
As we have another instructor answering questions I tend to ignore the chat and run through each section as slowly as I can without going over time. Personally my default is to go too fast, so forcing myself to be slow but having some timings to keep me on track seems to work well. But you should do whatever works for you.
During the labs I tend to mute my microphone and join in with answering questions on the chat.
Wrapping things up
When you’re nearing the end it’s good to have some time for any final questions. People may want to ask things that they didn’t get a chance to earlier or have questions which haven’t fit in with any particular area.
If you get complex questions or want to go in to depth you may want to offer to stay after and continue talking, but your attendees will appreciate you finishing at the scheduled time as they may have other things booked immediately after.
It’s always good to leave folks with some extra resources, whether that is links to the documentation, community places they can learn more like a Gitter chat, etc.
Sharing the content later
Once you’re done it is also beneficial to upload a recording of the tutorial to YouTube. If you’ve livestreamed then this may happen automatically. If you used a tool like Zoom you’ll need to upload it to yourself.
Anyone watching in the future won’t get the benefit of the interactivity, but should still be able to get much of the benefit from following through the material.
Gathering feedback and planning for next time
The last thing for you to do is plan for next time. The Dask team have decided to run tutorials every month or so but rotate around timezones to try and cover as many users as possible. We’ve also discussed having special deep dive tutorials which follow the same length and format but dive into one topic in particular.
To help you plan for future events you will likely want feedback from your participants. You can use tools like Google Forms to create a short questionnaire which you can send out to participants afterwards. In our experience about 20% of participants will fill in a survey that is 10 questions long.
This feedback can be very helpful for making changes to the content or format. For example in our first tutorial we use OBS for both the intro screen and screen sharing throughout. However Zoom limits webcams to 720p and adds heavy compression, so the quality for participants was not good and 50% of the surveys mentioned poor video. In later tutorials we only used OBS for the intro screen and then used the built in screen sharing utility in Zoom which provided a better experience and no user reported any audio/video issues in the survey.
Here are some examples of questions we asked and how they were answered for our tutorial.
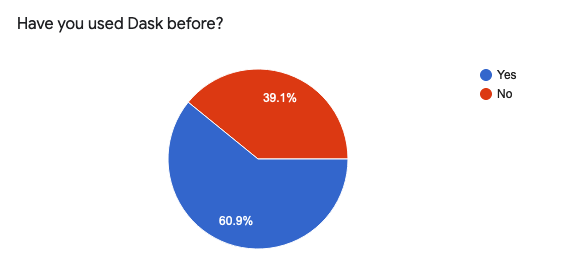
Have you used Dask before?
When writing our material we said we were “targeting users who were either new to Dask, or had been using it for a while but wanted to learn more about the wider project.”. Our feedback results confirm that we are hitting these groups.
We could’ve been more specific and asked folks to rank their ability. But the more complex the questions the less likely folks will fill them out, so it’s a balancing act.
Did we cover all the topics you were expecting? And if not, what was missing?
Depending on the complexity of your project you may have to make compromises on what you can cover in the time you have. Dask is a large project and so we couldn’t cover everything, so we wanted to check we had covered the basics.

Most of the feedback we had from folks who answered no were asking about advanced topics like Kubernetes, Google Cloud deployments, deep dives into internal workings, etc. I’m satisfied that this shouldn’t have been in this tutorial, but it adds weight to our plans to run deep dives in the future.
Once useful bit of feedback we had here was “When should I use Dask and when should I stick with Pandas?”. This is something which definitely should be covered by an intro tutorial, so our material is clearly lacking here. As a result we can go back and make modifications and improve the content.
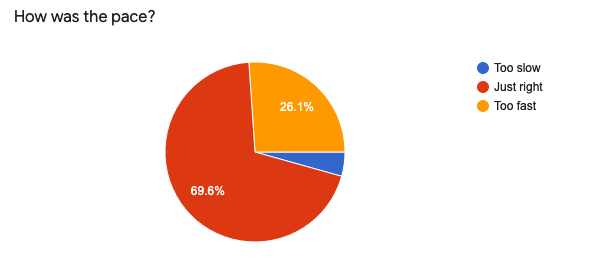
How was the pace?
Setting the pace is hard. If you’re targeting a range of abilities then it’s easy to go too fast or slow for a big chunk of the attendees.
Our feedback shows that folks were generally happy, but we are leaning on the side of being too fast. Given that we are filling our allocated time this probably indicates that we should cut a little content in order to slow things down.
Which sections did you find more informative?
By asking what sections were most informative we can identify things to cut in future if we do need to slow things down. It also shows areas where we may want to spend more time and add more content.

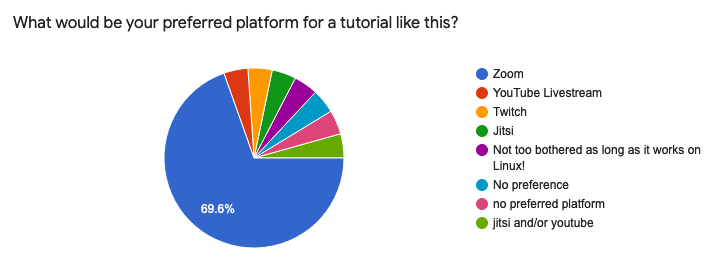
What would be your preferred platform for a tutorial like this?
We had to make a decision on which video platform to use based on the criteria we discussed earlier. For our tutorials we chose Zoom. By doing a user survey we were able to check that this worked for people and also see if there is an alternative that folks prefer.
Our results confirmed that folks were happy with Zoom. These results may be a little biased given that we used Zoom, but I’m confident that we can keep using it and folks will have a good experience.
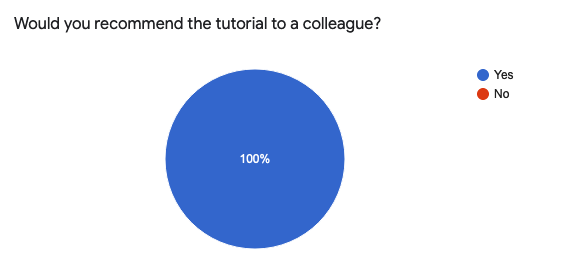
Would you recommend the tutorial to a colleague?
The last thing to check is that folks had a good time. It gives you great pleasure as an instructor to see 100% of folks say they would recommend to a colleague.
These results may be biased because if folks wouldn’t recommend it they probably wouldn’t bother to fill out a survey. But hey, I’ll take it!
Wrap up
In this post we have covered why and how you can run community tutorials for open source projects.
In summary you should run tutorials because:
- You can share knowledge with a range of people with different learning styles
- You can give back to your community
- You can grow your community
- You can improve maintainers knowledge of the whole project
And you can run a tutorial by following these steps:
- Break your project into sections
- Write up interactive documents on each section with tools like Jupyter notebooks
- Give people access to this content with services like Binder
- Manage attendees with services like Eventbrite
- Advertise your tutorial on social media
- Get everyone in a video meeting
- Make use of the interactive tools
- Deliver your material
- Gather feedback