 Jacob Tomlinson
In a couple of days Docker will begin charging employees of companies with >250 employees to use Docker Desktop. I have no problem with paying for software that brings me value, but you wouldn’t believe how complex it can be for large companies to sign employees up to subscription services. Paperwork everywhere! To avoid this I’m evaluating alternatives for Docker Desktop to use on my MacBook.
Updated 31 Jan 22 - Added workaround to get kind working with Colima.
What is Docker Desktop for Mac?
Docker Desktop for Mac is an application (also available for Windows) that runs Docker inside a virtual machine transparently. All you need to do is install Docker Desktop and start the service and you can run Docker containers from the command line on your Mac. It neatly makes your local filesystem available to containers via volume mounts and maps all ports back to your Mac. It feels just like running Docker on Linux. Recently it has also supported running Kubernetes on your Mac, although I’ve always found it finnicky and used alternatives like kind.
It also has a GUI for accessing your containers, images and settings.
I’ve been a user since the beta and it was called “Docker for Mac”. In all honesty I miss the old UI.
My Requirements
Here are the core features that Docker Desktop provides that I use and care about that I am looking for a replacement for.
- Use the
dockercommands in the same way you would on Linux. - Mount volumes from my Mac into the container with the
-vflag. - Expose ports on my Mac with the
-pflag. - Create Kubernetes clusters inside containers with kind.
- Use Docker on a poor network connection (like on a train).
- Configure the resources that Docker is using on my Mac (CPU, memory, storage).
- It should be easy to install/use!
Things that Docker Desktop provides that I don’t need.
- A graphical UI.
- Kubernetes, because I prefer to use kind.
I like kind because I can create multiple Kubernetes clusters with different versions and configurations, this is great when building and testing tools for Kubernetes. This may be less relevant to you if you consider yourself a Kubernetes user rather than a developer. I also like how portable it is and how it integrates nicely with test suites like pytest-kind.
To test out my alternatives I am going to install them and do the following things:
- Run an Nginx container that serves an HTML file from my MacBook on port 8080.
- Run my Nginx container again with the WiFi turned off.
- Create a
kindcluster. - Modify the hardware allocation that Docker has access to.
I’ll score each option out of 5, a point for volumes, ports, works offline, runs kind and can easily modify the hardware allocation.
For my testing I’m going to create a directory in my home directory called test on my Mac with an index.html file in that looks like this:
<!DOCTYPE html>
<html>
<body>
<h1>It works!</h1>
<p>Docker volumes and ports working as expected.</p>
</body>
</html>
Docker Desktop alternatives
I’m going to work through this non-exhaustive list of alternatives that I found by googling around.
Did I miss any other options? Let me know!
Colima
Colima is built on Lima which is a virtual machine tool for MacOS with automatic file sharing and port forwarding. Using Lima feels a lot like using WSL on Windows.
Colima builds on that foundation to run a VM with Docker installed and it also configures your local docker context for you.
Installing
$ brew install docker colima

$ colima start
INFO[0000] starting colima
INFO[0000] creating and starting ...                     context=vm
INFO[0030] provisioning ...                              context=docker
INFO[0031] restarting VM to complete setup ...           context=docker
INFO[0031] stopping ...                                  context=vm
INFO[0037] starting ...                                  context=vm
INFO[0058] starting ...                                  context=docker
INFO[0063] waiting for startup to complete ...           context=docker
INFO[0063] done
That’s it! Colima is now running Docker in a Lima VM and it created a new docker context and switched to it so we can use the docker CLI straight away.
$ docker ps
CONTAINER ID   IMAGE     COMMAND   CREATED   STATUS    PORTS     NAMES

$ docker context list
NAME                TYPE                DESCRIPTION                               DOCKER ENDPOINT                                    KUBERNETES ENDPOINT                ORCHESTRATOR
colima *            moby                colima                                    unix:///Users/jtomlinson/.colima/docker.sock
default             moby                Current DOCKER_HOST based configuration   unix:///var/run/docker.sock                        https://127.0.0.1:6443 (default)   swarm
desktop-linux       moby                                                          unix:///Users/jtomlinson/.docker/run/docker.sock
Testing
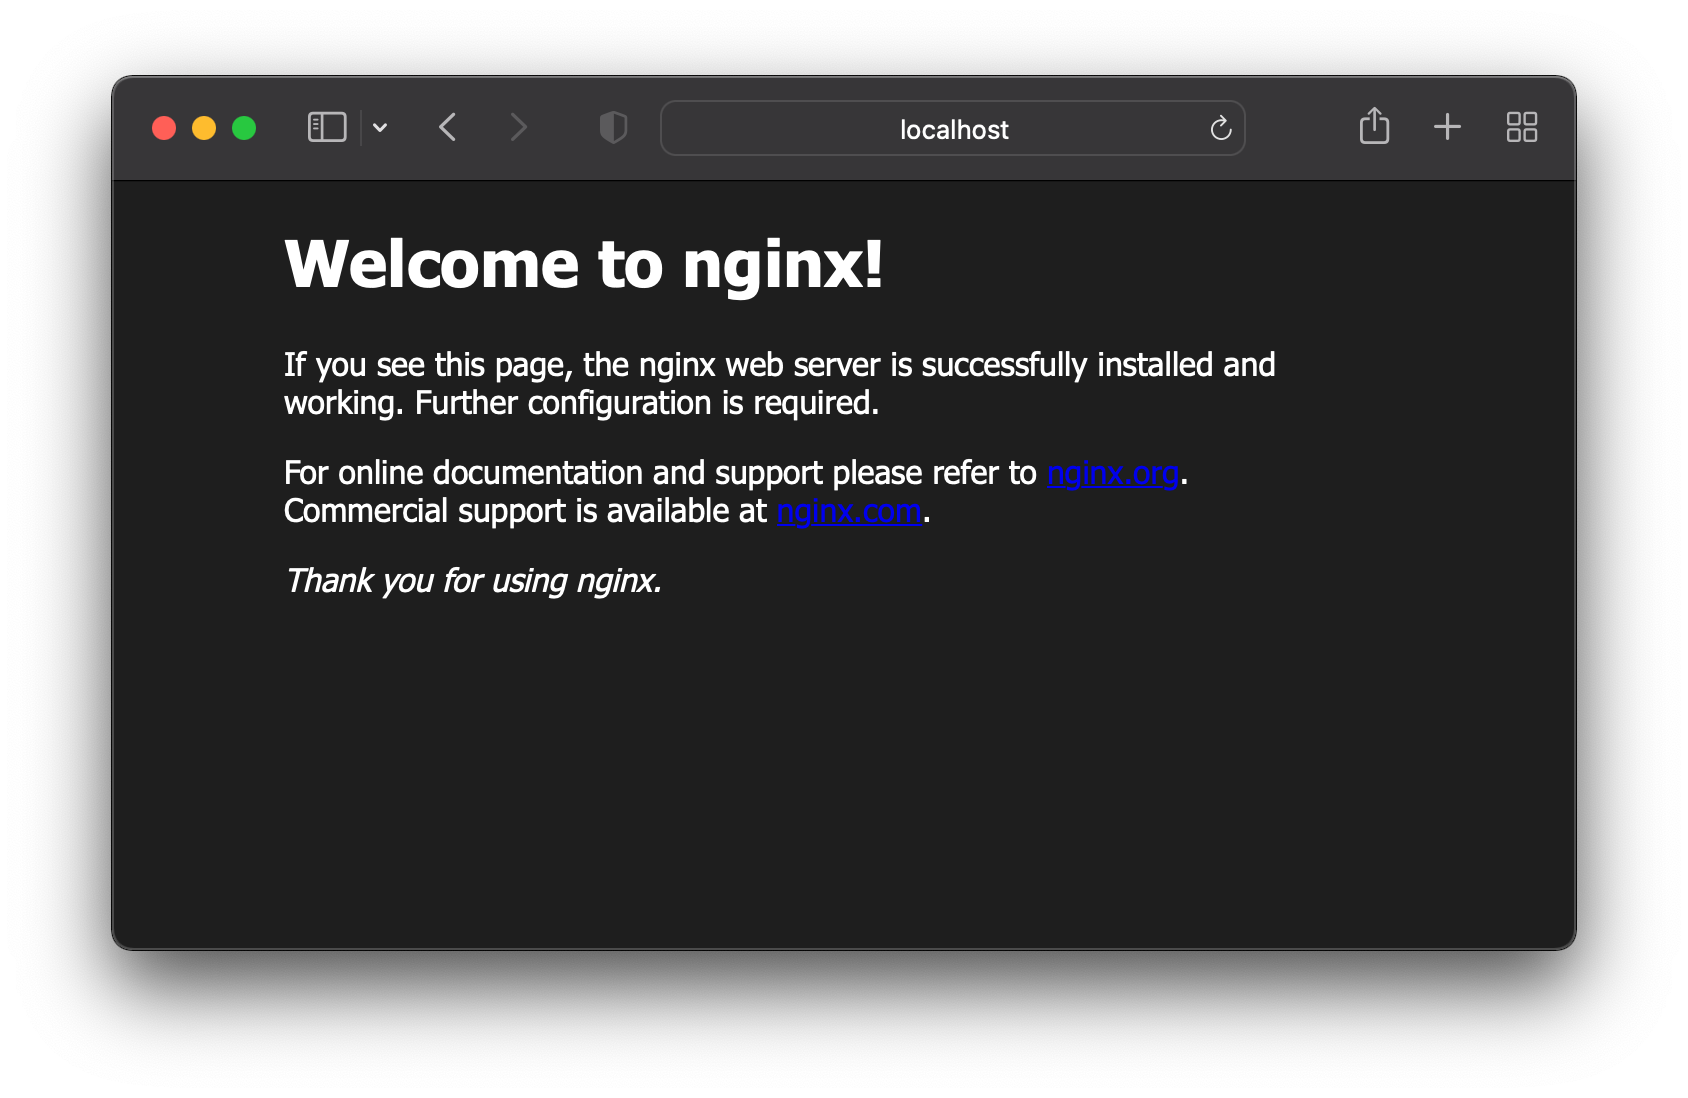
Let’s start our nginx container.
$ docker run --rm -p 8080:80 -v $HOME/test:/usr/share/nginx/html:ro nginx
Now I can head to my browser and check that it works.

Hooray! That worked, my volume mounted successfully and the port was made available on my laptop. I also successfully disabled my wifi and ran the command again and got the same result.
Next let’s create a kind cluster.
The current version of kind is v0.11.1 which contains a bug that prevents kind from working with colima. This has been fixed upstream but is yet to be released, so first we need to install the latest development version of kind.
$ brew unlink kind

$ brew install kind --HEAD
Now we can create our kind cluster.
$ kind create cluster --name test
Creating cluster "test" ...
 ✓ Ensuring node image (kindest/node:v1.23.1) 🖼
 ✓ Preparing nodes 📦
 ✓ Writing configuration 📜
 ✓ Starting control-plane 🕹️
 ✓ Installing CNI 🔌
 ✓ Installing StorageClass 💾
Set kubectl context to "kind-test"
You can now use your cluster with:

kubectl cluster-info --context kind-test

Thanks for using kind! 😊
Hooray now we have a kind cluster running in a Docker container inside colima. Let’s use kubectl to check everything is up and running.
$ kubectl get all --context kind-test -A
NAMESPACE            NAME                                             READY   STATUS    RESTARTS   AGE
kube-system          pod/coredns-64897985d-ksnlj                      1/1     Running   0          15s
kube-system          pod/coredns-64897985d-np59l                      1/1     Running   0          15s
kube-system          pod/etcd-test-control-plane                      1/1     Running   0          27s
kube-system          pod/kindnet-2zfr5                                1/1     Running   0          15s
kube-system          pod/kube-apiserver-test-control-plane            1/1     Running   0          27s
kube-system          pod/kube-controller-manager-test-control-plane   1/1     Running   0          27s
kube-system          pod/kube-proxy-gjqss                             1/1     Running   0          15s
kube-system          pod/kube-scheduler-test-control-plane            1/1     Running   0          27s
local-path-storage   pod/local-path-provisioner-5bb5788f44-d8ww5      1/1     Running   0          15s

NAMESPACE     NAME                 TYPE        CLUSTER-IP   EXTERNAL-IP   PORT(S)                  AGE
default       service/kubernetes   ClusterIP   10.96.0.1    <none>        443/TCP                  30s
kube-system   service/kube-dns     ClusterIP   10.96.0.10   <none>        53/UDP,53/TCP,9153/TCP   28s

NAMESPACE     NAME                        DESIRED   CURRENT   READY   UP-TO-DATE   AVAILABLE   NODE SELECTOR            AGE
kube-system   daemonset.apps/kindnet      1         1         1       1            1           <none>                   21s
kube-system   daemonset.apps/kube-proxy   1         1         1       1            1           kubernetes.io/os=linux   27s

NAMESPACE            NAME                                     READY   UP-TO-DATE   AVAILABLE   AGE
kube-system          deployment.apps/coredns                  2/2     2            2           28s
local-path-storage   deployment.apps/local-path-provisioner   1/1     1            1           19s

NAMESPACE            NAME                                                DESIRED   CURRENT   READY   AGE
kube-system          replicaset.apps/coredns-64897985d                   2         2         2       16s
local-path-storage   replicaset.apps/local-path-provisioner-5bb5788f44   1         1         1       16s
Let’s move on and try to modify the resources available to the Lima VM. It seems that by default the VM has 2 CPU cores, 2GiB of memory and 60Gib of storage. We can modify the CPU and memory by stopping and starting Colima.
$ colima stop
INFO[0000] stopping colima
INFO[0000] stopping ...                                  context=docker
INFO[0001] stopping ...                                  context=vm
INFO[0005] done
$ colima start --cpu 4 --memory 8
INFO[0000] stopping colima
INFO[0000] stopping ...                                  context=docker
INFO[0001] stopping ...                                  context=vm
INFO[0006] done
INFO[0000] using docker runtime
INFO[0000] starting colima
INFO[0000] starting ...                                  context=vm
INFO[0020] provisioning ...                              context=docker
INFO[0021] starting ...                                  context=docker
INFO[0026] waiting for startup to complete ...           context=docker
INFO[0026] done
However if we want to modify the storage allocation we need to delete the VM and recreate it, which is straight forward but means we will lose our container and images.
$ colima stop
INFO[0000] stopping colima
INFO[0000] stopping ...                                  context=docker
INFO[0001] stopping ...                                  context=vm
INFO[0005] done

$ colima delete
are you sure you want to delete colima and all settings? [y/N] y
INFO[0001] deleting colima
INFO[0001] deleting ...                                  context=vm
INFO[0001] done

$ colima start --cpu 4 --memory 8 --disk 100
INFO[0000] starting colima
INFO[0000] creating and starting ...                     context=vm
INFO[0030] provisioning ...                              context=docker
INFO[0031] restarting VM to complete setup ...           context=docker
INFO[0031] stopping ...                                  context=vm
INFO[0037] starting ...                                  context=vm
INFO[0057] starting ...                                  context=docker
INFO[0063] waiting for startup to complete ...           context=docker
INFO[0063] done
Pros/Cons
Colima seems pretty nice and checks all of our requirements. It was easy to install and use and you can dynamically change CPU and memory allocations on the fly. It’s a shame that the storage cannot be reallocated without deleting all of our containers and images. We also needed a development version of kind so I’m going to subtract half a point for that.
It gets 4.5/5.
Podman
Next up is Podman, a Docker alternative from RedHat. Podman follows the same command line API as Docker so it makes for a nice drop in replacement.
Installing
$ brew install podman

$ podman machine init

$ podman machine start
INFO[0000] waiting for clients...
INFO[0000] listening tcp://127.0.0.1:7777
INFO[0000] new connection from  to /var/folders/0l/fmwbqvqn1tq96xf20rlz6xmm0000gp/T/podman/qemu_podman-machine-default.sock
Waiting for VM ...
Machine "podman-machine-default" started successfully
Now we have podman running we can use the podman cli in exactly the same way as we use docker.
$ podman ps
CONTAINER ID  IMAGE       COMMAND     CREATED     STATUS      PORTS       NAMES
Optionally you could even alias docker=podman.
Testing
Let’s start our nginx container.
$ docker run --rm -p 8080:80 -v $HOME/test:/usr/share/nginx/html:ro nginx
Error: statfs /Users/jtomlinson/test: no such file or director
Oh no, it looks like our volume mounts don’t work here. This is because podman doesn’t make files from my mac available inside the podman VM. It looks like there are plans to make this happen, but they haven’t been implemented yet.
Let’s try running the command without the volume mount.
$ docker run --rm -p 8080:80 nginx
This works so port mappings seem to be fine.
Disabling my wifi and running the command again works, so network access is not required. However I did notice that hitting ctrl+c didn’t stop the container and I had to manually run podman rm -f <name> to stop it. Not a problem but definitely different to docker.
Now let’s launch a Kubernetes cluster with kind. We need to make a few modifications to our podman vm following the kind documentation here.
$ podman machine ssh

$ sudo bash

$ mkdir /etc/systemd/system/user@.service.d/

$ cat <<EOF >/etc/systemd/system/user@.service.d/delegate.conf
[Service]
Delegate=yes
EOF

$ cat <<EOF >/etc/modules-load.d/iptables.conf
ip6_tables
ip6table_nat
ip_tables
iptable_nat
Then logout and restart the VM.
$ podman machine stop

$ podman machine start
We can run our kind create command now but need to set an environment first to enable the experimental podman support in kind.
$ KIND_EXPERIMENTAL_PROVIDER=podman kind create cluster --name test
using podman due to KIND_EXPERIMENTAL_PROVIDER
enabling experimental podman provider
Cgroup controller detection is not implemented for Podman. If you see cgroup-related errors, you might need to set systemd property "Delegate=yes", see https://kind.sigs.k8s.io/docs/user/rootless/
Creating cluster "test" ...
 ✓ Ensuring node image (kindest/node:v1.21.1) 🖼
 ✓ Preparing nodes 📦
 ✓ Writing configuration 📜
 ✓ Starting control-plane 🕹️
 ✓ Installing CNI 🔌
 ✓ Installing StorageClass 💾
Set kubectl context to "kind-test"
You can now use your cluster with:

kubectl cluster-info --context kind-test

Have a question, bug, or feature request? Let us know! https://kind.sigs.k8s.io/#community 🙂
This looks good, however when I run the kubectl cluster-info command above I get the following error.
$ kubectl cluster-info --context kind-test
Alias tip: k cluster-info --context kind-test
2022/01/28 14:20:31 tcpproxy: for incoming conn 127.0.0.1:61571, error dialing "192.168.127.2:61448": connect tcp 192.168.127.2:61448: connection was refused
2022/01/28 14:20:32 tcpproxy: for incoming conn 127.0.0.1:61573, error dialing "192.168.127.2:61448": connect tcp 192.168.127.2:61448: connection was refused
2022/01/28 14:20:33 tcpproxy: for incoming conn 127.0.0.1:61575, error dialing "192.168.127.2:61448": connect tcp 192.168.127.2:61448: connection was refused
Something is definitely not right with the network connectivity into the podman VM.
Let’s try our last task of changing the VM resources. With podman these can only be set during podman machine init so we need to delete everything and start from the beginning.
$ podman machine stop

$ podman machine rm

$ podman machine init --cpus 2 --memory 2048 --disk-size 20

$ podman machine start
Pros/Cons
Podman is heading in a great direction as a deamonless alternative to Docker. But it is exactly that, not Docker. I’ve not only noticed that there are differences between the behavior of certain commands but also that it needs to be treated specially by kind. Given that I work on tools and documentation targeting folks using Docker it would make my like easiest if I am running Docker too.
It managed to map ports, works offline and can reallocate hardware, but I’m going to subtract a point for not being Docker.
2/5.
Minikube
Now let’s look at Minikube. Minikube is a tool to help you set up and run Kubernetes an any operating system for local development. I’ve already mentioned that I want to use kind for my Kubernetes work, but Minikube creates a VM with Docker running and runs it’s Kubernetes on that, so we can also use that Docker directly.
Installing
$ brew install minikube

$ minikube start --driver=hyperkit
😄  minikube v1.25.1 on Darwin 12.1
✨  Using the hyperkit driver based on user configuration
👍  Starting control plane node minikube in cluster minikube
🔥  Creating hyperkit VM (CPUs=2, Memory=4000MB, Disk=20000MB) ...
🐳  Preparing Kubernetes v1.23.1 on Docker 20.10.12 ...
    ▪ kubelet.housekeeping-interval=5m
    ▪ Generating certificates and keys ...
    ▪ Booting up control plane ...
    ▪ Configuring RBAC rules ...
🔎  Verifying Kubernetes components...
    ▪ Using image gcr.io/k8s-minikube/storage-provisioner:v5
🌟  Enabled addons: storage-provisioner, default-storageclass
🏄  Done! kubectl is now configured to use "minikube" cluster and "default" namespace by default

$ eval $(minikube -p minikube docker-env)
Here we start the Minikube VM and use the docker-env command to set up our local environment to connect to the Docker in the VM. We would need to do this every time we open a shell or add this to our .bashrc which isn’t very convenient. We could manually add a Docker context to use instead. First we need to check the values set by the minikube docker-env command and then create a context.
$ minikube -p minikube docker-env
export DOCKER_TLS_VERIFY="1"
export DOCKER_HOST="tcp://192.168.64.3:2376"
export DOCKER_CERT_PATH="/Users/jtomlinson/.minikube/certs"
export MINIKUBE_ACTIVE_DOCKERD="minikube"

# To point your shell to minikube's docker-daemon, run:
# eval $(minikube -p minikube docker-env)

$ docker context create minikube --description "minikube" --docker "host=tcp://192.168.64.2:2376,ca=/Users/jtomlinson/.minikube/certs/ca.pem,cert=/Users/jtomlinson/.minikube/certs/cert.pem,key=/Users/jtomlinson/.minikube/certs/key.pem"

$ docker context use minikube
Either way you should now be able to access Docker.
$ docker ps
CONTAINER ID   IMAGE                  COMMAND                  CREATED          STATUS          PORTS     NAMES
19fee5ef6441   6e38f40d628d           "/storage-provisioner"   2 seconds ago    Up 2 seconds              k8s_storage-provisioner_storage-provisioner_kube-system_6bbd1d44-058e-451f-8502-6472c209c3f7_1
8e7032248f94   a4ca41631cc7           "/coredns -conf /etc…"   32 seconds ago   Up 33 seconds             k8s_coredns_coredns-64897985d-b4thw_kube-system_13403e07-ec08-45b5-b378-19da17114f93_0
71de010480fd   b46c42588d51           "/usr/local/bin/kube…"   33 seconds ago   Up 33 seconds             k8s_kube-proxy_kube-proxy-ndq8n_kube-system_3e529d6e-3c8a-4899-a8d5-a10690afed77_0
9ef2a86e03cc   k8s.gcr.io/pause:3.6   "/pause"                 33 seconds ago   Up 33 seconds             k8s_POD_coredns-64897985d-b4thw_kube-system_13403e07-ec08-45b5-b378-19da17114f93_0
6e0513aab64b   k8s.gcr.io/pause:3.6   "/pause"                 33 seconds ago   Up 34 seconds             k8s_POD_kube-proxy-ndq8n_kube-system_3e529d6e-3c8a-4899-a8d5-a10690afed77_0
807bc12d32a5   k8s.gcr.io/pause:3.6   "/pause"                 34 seconds ago   Up 34 seconds             k8s_POD_storage-provisioner_kube-system_6bbd1d44-058e-451f-8502-6472c209c3f7_0
90bd9e84c02c   71d575efe628           "kube-scheduler --au…"   54 seconds ago   Up 54 seconds             k8s_kube-scheduler_kube-scheduler-minikube_kube-system_b8bdc344ff0000e961009344b94de59c_0
c797c4aef3aa   25f8c7f3da61           "etcd --advertise-cl…"   54 seconds ago   Up 54 seconds             k8s_etcd_etcd-minikube_kube-system_784bb9912f58da5bb41429cf74502a65_0
dfb754a80566   f51846a4fd28           "kube-controller-man…"   54 seconds ago   Up 54 seconds             k8s_kube-controller-manager_kube-controller-manager-minikube_kube-system_d3f0dbc1c3a23fddbc9f30b9e08c775e_0
0ec76bb6c0ab   b6d7abedde39           "kube-apiserver --ad…"   54 seconds ago   Up 54 seconds             k8s_kube-apiserver_kube-apiserver-minikube_kube-system_e96765452e79009354d0106c7a1d1e66_0
197ad29faec6   k8s.gcr.io/pause:3.6   "/pause"                 55 seconds ago   Up 54 seconds             k8s_POD_kube-scheduler-minikube_kube-system_b8bdc344ff0000e961009344b94de59c_0
168bd574907d   k8s.gcr.io/pause:3.6   "/pause"                 55 seconds ago   Up 55 seconds             k8s_POD_kube-controller-manager-minikube_kube-system_d3f0dbc1c3a23fddbc9f30b9e08c775e_0
5ee93e0e24a7   k8s.gcr.io/pause:3.6   "/pause"                 55 seconds ago   Up 55 seconds             k8s_POD_kube-apiserver-minikube_kube-system_e96765452e79009354d0106c7a1d1e66_0
ab47d13d0ded   k8s.gcr.io/pause:3.6   "/pause"                 55 seconds ago   Up 55 seconds             k8s_POD_etcd-minikube_kube-system_784bb9912f58da5bb41429cf74502a65_0
Note we can see all the containers running in the Minikube Kubernetes cluster too.
Testing
Let’s try our test container again.
Unfortunately volumes and ports are not made available by Minikube automatically, so we need to open a couple of terminals.
In the first we need to mount our home directory into the Minikube VM.
$ minikube mount $HOME:$HOME
📁  Mounting host path /Users/jtomlinson into VM as /Users/jtomlinson ...
    ▪ Mount type:
    ▪ User ID:      docker
    ▪ Group ID:     docker
    ▪ Version:      9p2000.L
    ▪ Message Size: 262144
    ▪ Options:      map[]
    ▪ Bind Address: 192.168.64.1:62386
🚀  Userspace file server: ufs starting
✅  Successfully mounted /Users/jtomlinson to /Users/jtomlinson

📌  NOTE: This process must stay alive for the mount to be accessible ...
Then in the second we need to tunnel traffic into our VM.
$ minikube tunnel
Password:
Status:
        machine: minikube
        pid: 25571
        route: 10.96.0.0/12 -> 192.168.64.3
        minikube: Running
        services: []
    errors:
                minikube: no errors
                router: no errors
                loadbalancer emulator: no errors
Now we can run our container.
$ docker run --rm -p 8080:80 -v $HOME/test:/usr/share/nginx/html:ro nginx
We should now be able to access our container, but not at localhost. Minikube routes traffic through a virtual IP that we can see in the minikube tunnel output. So in this case we need to visit http://192.168.64.3:8080.
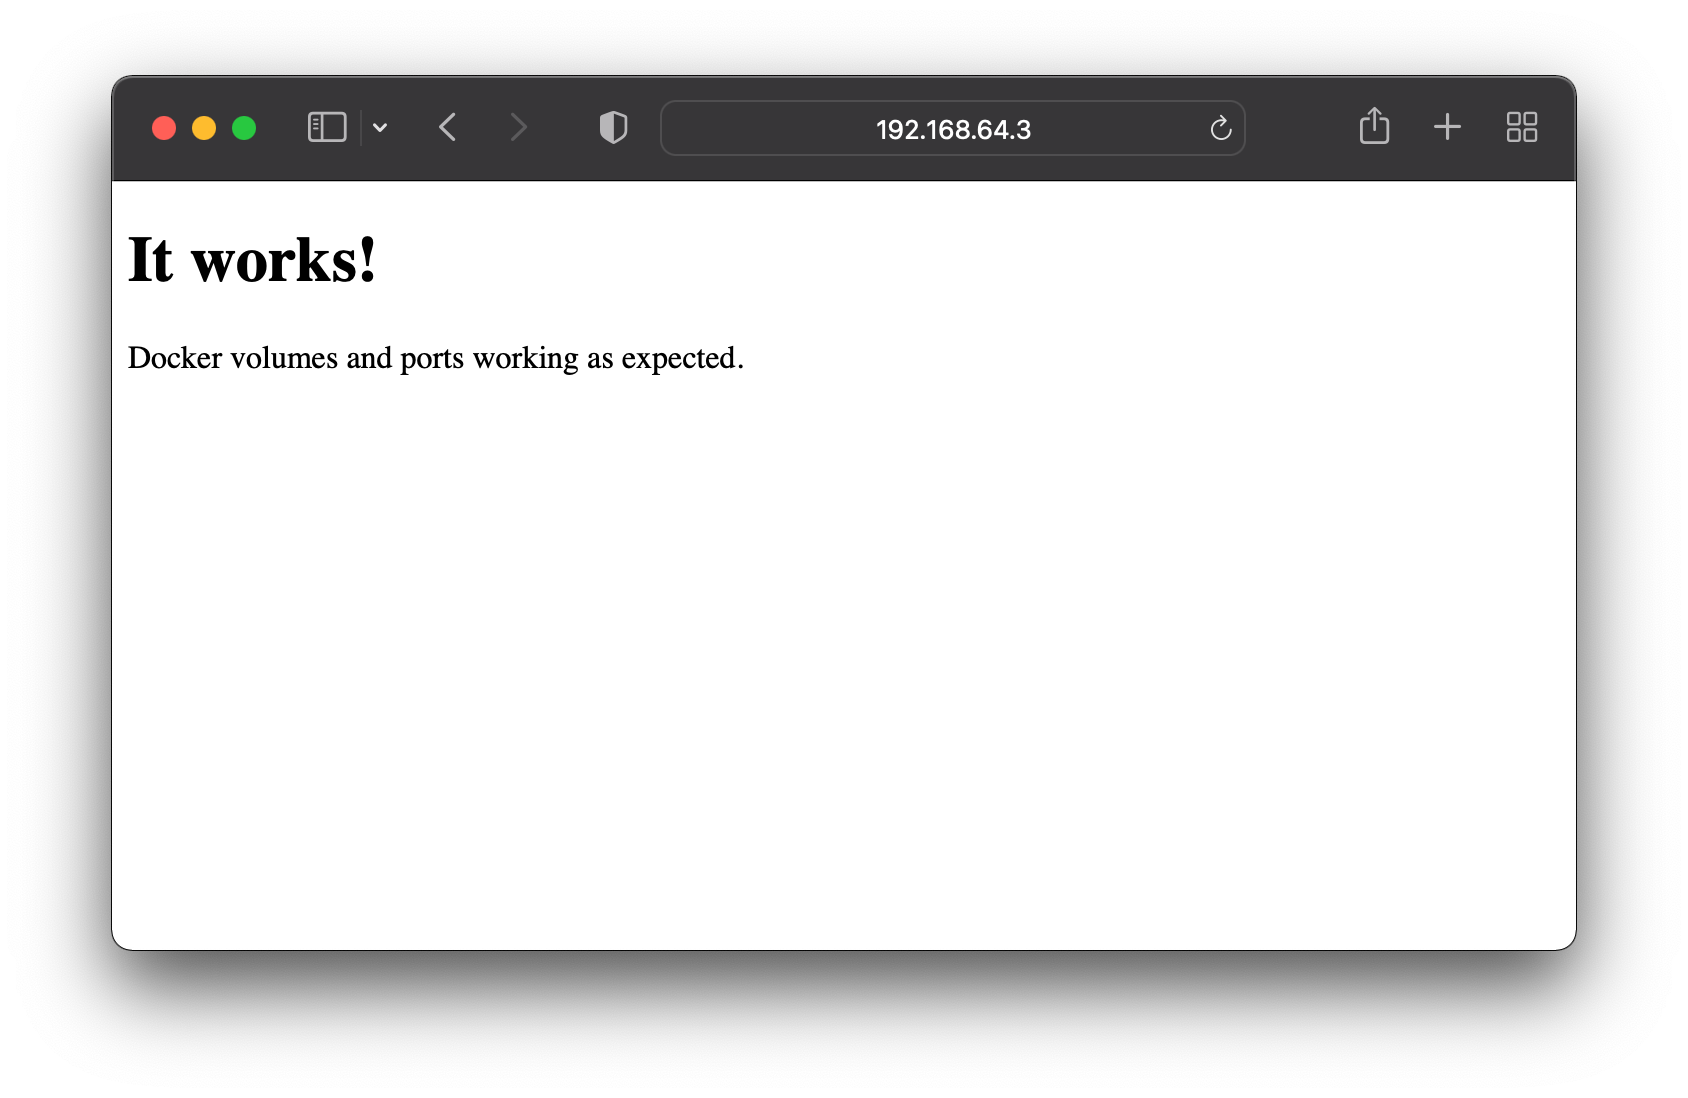
This also works without WiFi.
Next let’s try running kind.
Again the cluster seems to create successfully but running the kubectl command fails.
$ kubectl cluster-info --context kind-test

To further debug and diagnose cluster problems, use 'kubectl cluster-info dump'.
The connection to the server 192.168.64.3:62939 was refused - did you specify the right host or port?
I even tried editing my ~/.kube/config file and changed the address from 127.0.0.1 to the one provided by the minikube tunnel command, but no luck.
Finally let’s try changing the resources. Again we need to stop and delete the VM and start again from scratch.
$ minikube stop

$ minikube delete

$ minikube start --driver=hyperkit --memory 8192 --cpus 2 --disk-size=100g
Pros/cons
Minikube seems like a useful tool for running Kubernetes clusters in VMs on your machine. The fact that it runs Docker inside means that technically you can connect to it and leverage it directly. But as we’ve seen that experience is less than ideal.
I’ll give it half a point for ports and volumes because they work, but painfully.
2/5.
Run Docker on a virtual machine or remote machine
We could also run Linux ourselves either in a virtual machine or remotely on another system. However both of these options would mean visiting a different IP to access your containers and not being able to mount files from your Mac directly. Using a remote machine also means that you would lose access if you didn’t have a decent network connection.
This means that a VM would only get 2/5 and a remove machine only 1/5.
In this case you might as well develop directly on that Linux machine over SSH, it’ll make your life easier.
Conclusion
Looking at the results of my testing there is a clear winner, Colima. It has excellent ease of installation and tight binding to the Mac filesystem and ports. Running more complex things like kind require jumping through a couple of hoops that aren’t necessary with Docker Desktop for Mac, but that are minimal compromises that I’m sure will be ironed out in the future.
Looks like I’m switching to Colima!