 Jacob Tomlinson
Introduction
Testing your blog may sound like an odd thing to do, but if you’re running a Jekyll blog hosted on GitHub it is simple to set up and really useful for notifying you about broken links and other issues.
Things you should test
You should check for good practice items in your article which you might forget to do. Things like including alt tags for your images or making sure your links actually go somewhere. These are the kind of things you leave blank while writing and think “I’ll fill that in later” and then never do so.
There are also things which may break over time without you realising. This is mainly external urls and image links which may have changed and no longer exist.
Finally you should ensure your html complies to standards. This is more to do with the Jekyll theme rather than the articles you’re writing but you always want to ensure your website is going to display correctly for everyone.
Travis CI
This is where Travis CI comes in. Travis CI is a continuous integration platform which watches for you to commit code to your GitHub repository and then runs your code on an external server to test and even deploy it for you.
We wont discuss how to get started with Travis here so you may want to refer to their getting started guide. As Jekyll is ruby based you’ll want to read the ruby version of the guide.
You tell Jekyll what to do with your code by including a YAML file in your repository
called .travis.yml. We will be specifying ruby as the language which will cause Travis
to ensure ruby is installed and will automatically install any gems you specify in
a file called Gemfile.
A Gemfile is basically a set of dependencies for your application, if you haven’t got one
in your Jekyll blog repository you’ll want to create one with the following content.
source 'https://rubygems.org'
gem 'github-pages'
gem 'html-proofer'
This tells Travis to use bundler to install the GitHub pages dependencies which include Jekyll and also a tool called HTML Proofer which we will use to test our blog.
So once Travis has ensured ruby is installed to the version we want and the gems are installed
we then need to specify what commands we want it to run. We want it to build our Jekyll
site and then run HTML proofer, to do this your .travis.yml will want to look
something like this.
language: ruby
rvm:
  - 2.1
script:
  - bundle exec jekyll build
  - bundle exec htmlproofer ./_site --only-4xx --check-favicon --check-html
env:
  global:
    - NOKOGIRI_USE_SYSTEM_LIBRARIES=true # speeds up installation of html-proofer
This will build your site into _site on the Travis server and then run HTML Proofer
on the generated HTML.
HTML proofer
HTML proofer will by default follow all of the links in your website and ensure that the destination exists. It will ensure all the referenced images exist and also check whether you have specified alt tags for those images.
It also has some optional extended functionality which I have enabled in my tests.
The first is --only-4xx. This tells HTML Proofer to only throw an error when it
hits an error message in the 400-499 range. This means it ignores errors like 500 or 503
on external urls which are usually temporary issues and down to the external service
to resolve, we don’t want things which are out of our control to fail our build.
Next is --check-favicon. This does exactly what it says on the tin, it ensures
you have correct favicons configured for your site.
Last is --check-html. This uses Nokogiri to check that your HTML is well formed.
It will throw errors when you do things like not closing divs correctly or double
declaring attributes. As I said before this is down to your theme rather than
your content but you still want to test it.
Pull Requests
Setting this up means that whenever you commit to your Jekyll blog it will test you code and make sure it is correct, if it isn’t it will send you an email saying that the build has failed and will allow you to see the output of HTML Proofer so that you can fix the problem.
It will also do this when someone (or you) submits a pull request. Travis will see the pull request, test the code and then advise within the pull request window whether it is safe to merge.
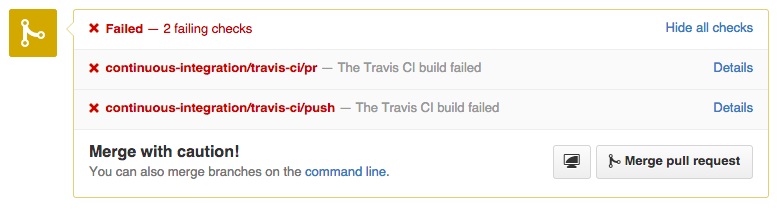
So if the build fails you will get a message like this:
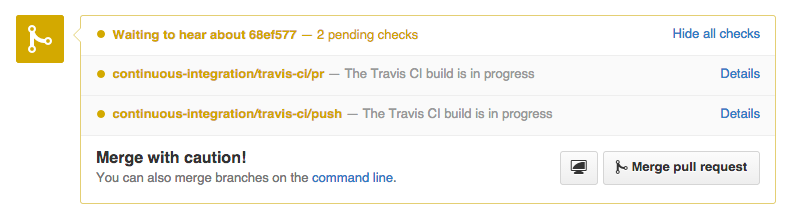
Or if it succeeds you get given the go ahead to merge:

If you’re following a GitHub workflow using pull requests this can be a great way to make sure that everything which goes into the master branch is already tested.
Conclusion
This is just one simple way of testing your blog. If you wanted to take it further you could get Travis to install additional tools and scripts for checking spelling and grammar, ensuring your images are hosted on a CDN or even making sure you don’t have any emoji in your article.
If you don’t want to host your website on GitHub Pages you can also get Travis
to deploy your _site to another server such as a VPS or maybe an Amazon S3 Bucket.